
Table of Contents >> Show >> Hide
- Why Backing Up Your iPhone Without WiFi Matters
- Before You Start: A Few Quick Checks
- Way #1: Backup iPhone to a Mac Using Finder
- Way #2: Backup iPhone to a Windows PC Using Apple Devices or iTunes
- Way #3: Backup iPhone to iCloud Over Cellular Data
- Which Backup Method Is Best?
- Common Mistakes to Avoid
- Extra Tips for Safer iPhone Backups
- Real-World Experiences With Backing Up an iPhone Without WiFi
- Final Thoughts
- SEO Tags
section.
If your WiFi is down, your router is acting like it has personal beef with you, or you are traveling with nothing but a charging cable and determination, good news: you can still back up your iPhone. In fact, learning how to backup iPhone without WiFi is one of those life skills that feels boring right up until the moment your phone crashes, disappears, or decides to update itself into a mini heart attack.
The idea that iPhone backups must happen over WiFi is only half true. Yes, iCloud usually prefers WiFi. But local computer backups do not care whether your router is alive, asleep, or plotting your downfall. And in some cases, newer iPhones can even back up to iCloud over cellular. That means you have more than one no-WiFi backup method in your toolkit.
In this guide, you will learn three easy ways to back up an iPhone without WiFi, when each option makes the most sense, what gets saved, what does not, and how to avoid the classic mistakes that leave people thinking they made a backup when they really just pressed buttons and hoped for the best.
Why Backing Up Your iPhone Without WiFi Matters
An iPhone backup is basically your device’s safety net. It can help restore your contacts, messages, app data, settings, photos, and more if your phone is lost, damaged, replaced, or reset. Without a recent backup, recovering your digital life can feel like trying to rebuild a sandcastle after the tide came in.
There are plenty of real-world situations where no-WiFi backup options matter:
- You are traveling and only have a laptop.
- Your home internet is out.
- You need a backup before a repair, trade-in, or iOS update.
- Your iCloud storage is full and you want a local backup instead.
- You want a faster, more complete backup stored on your own computer.
For many people, the best answer is not choosing one backup method forever. It is knowing which one fits the moment. Think of it like shoes: cloud backup is great for everyday life, but when the weather gets weird, you want boots.
Before You Start: A Few Quick Checks
Before using any backup method, do these basic prep steps:
- Charge your iPhone or keep it plugged in.
- Use a reliable USB or USB-C cable that supports data transfer, not just charging.
- Unlock your iPhone if prompted.
- Tap Trust This Computer if the message appears.
- Make sure your computer has enough free storage if you are creating a local backup.
One more important detail: if you want your backup to include sensitive data like saved passwords, Health data, call history, and WiFi settings, choose an encrypted local backup. If you skip encryption, your backup is still useful, but it may not be as complete.
Way #1: Backup iPhone to a Mac Using Finder
If you have a Mac running macOS Catalina or later, Finder is the easiest no-WiFi backup method. You connect your iPhone with a cable, a few clicks later, and boom: backup in progress. No cloud required. No router required. No ritual sacrifice to the tech gods required.
How to back up your iPhone to a Mac
- Connect your iPhone to your Mac with a USB or USB-C cable.
- Open Finder.
- In the sidebar, select your iPhone under Locations.
- Click the General tab.
- Select Back up all of the data on your iPhone to this Mac.
- To include Health data, passwords, and other sensitive information, check Encrypt local backup and create a password.
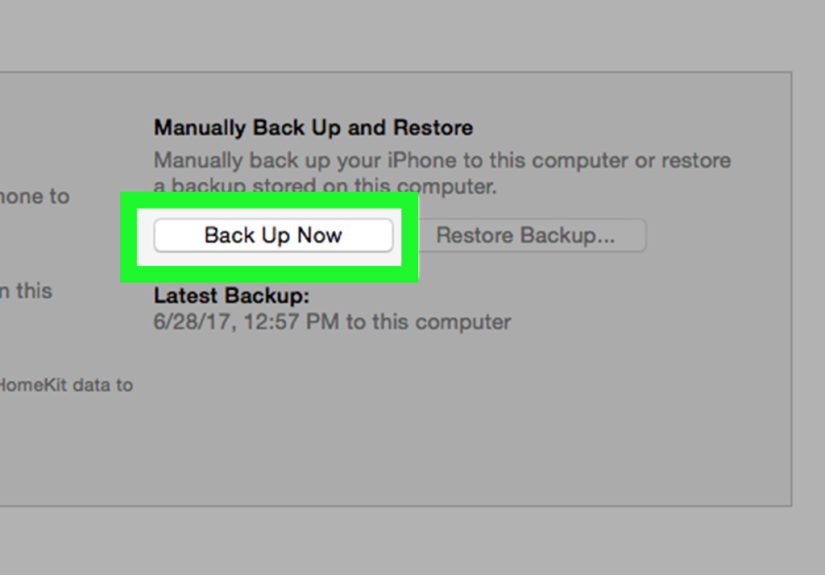
- Click Back Up Now.
When the process finishes, your Mac will display the date and time of the last successful backup. That is your proof that the backup actually happened. Never underestimate the number of people who leave this screen too early and assume success because the computer looked busy for a minute.
Why this method is great
- It does not need WiFi.
- It is usually faster than cloud backup for large photo libraries.
- You keep the backup on your own computer.
- Encrypted backups can save extra data that unencrypted ones do not.
Best use case
This method is ideal if you own a Mac, want a full local iPhone backup, or need a backup before replacing your device. It is also a smart choice if your internet connection is slow, unstable, or nonexistent.
Way #2: Backup iPhone to a Windows PC Using Apple Devices or iTunes
Windows users are not left out of the backup party. If you have a PC, you can back up your iPhone with the Apple Devices app. If your setup still uses iTunes, that works too. The basic idea is the same: connect the phone, trust the computer, and create a local backup straight to the PC.
How to back up your iPhone to a Windows computer
- Install and open the Apple Devices app on your PC. If you are using an older setup, open iTunes instead.
- Connect your iPhone to the PC with a cable.
- Enter your passcode on the iPhone if asked.
- Tap Trust This Computer if prompted.
- In Apple Devices, click General. In iTunes, click Summary.
- Select the option to back up all data to this computer.
- If you want a more complete backup, enable Encrypt local backup and set a password you will not forget.
- Click Back Up Now.
That is it. Your iPhone backup will be stored on your PC rather than in the cloud. This can be a lifesaver if your iCloud storage is full or you simply prefer keeping a local copy nearby.
Where the backup lives on your PC
If you ever want to verify or copy your backup, Apple provides default backup locations on Windows. Many users check the MobileSync backup folder to confirm that the files are there. That is also useful if you want to make an extra copy onto an external hard drive for even more protection.
Why this method is great
- It works without WiFi.
- It is practical for Windows users who do not own a Mac.
- It can save a full local backup before repairs, upgrades, or resets.
- It gives you direct control over where your backup is stored.
Best use case
This option is best if you use Windows every day, want to avoid iCloud limits, or need to back up an iPhone when internet access is unavailable. It is also useful in offices, school environments, or travel situations where you have your laptop but no trustworthy network.
Way #3: Backup iPhone to iCloud Over Cellular Data
This third method is the one people usually hope exists, and the answer is: sometimes. Some newer iPhones can back up to iCloud over cellular data rather than WiFi. This is not universal, so treat it like a nice bonus feature, not a guarantee handed down from the smartphone heavens.
When this works
On supported iPhone models with 5G and a carrier that allows it, you may see a setting called Back Up Over Cellular. If that switch is available, you can turn it on and back up without connecting to WiFi.
How to back up with cellular data
- Open Settings.
- Tap your name.
- Tap iCloud.
- Tap iCloud Backup.
- Turn on Back Up This iPhone.
- If available, turn on Back Up Over Cellular.
- Tap Back Up Now.
Keep in mind that iCloud backups can be large, especially if you are not using iCloud Photos or Messages in iCloud. If your cellular plan has data limits, this method can chew through them like a goat in a paper factory.
Why this method is great
- You do not need WiFi or a computer.
- It is handy while traveling or during internet outages.
- It is convenient for quick protection when you are away from home.
Best use case
This method works best for users with supported 5G iPhones, generous data plans, and available iCloud storage. It is a convenient emergency option when you need a backup right now and a cable-to-computer setup is not possible.
Which Backup Method Is Best?
Here is the simple breakdown:
Choose a Mac backup if…
- You have a Mac available.
- You want a fast, local backup.
- You prefer to store your data offline.
Choose a Windows backup if…
- You use a PC and want full device backups without WiFi.
- You do not want to rely on iCloud storage.
- You want the option to copy backups to another drive.
Choose cellular iCloud backup if…
- Your iPhone and carrier support backup over cellular.
- You do not have a computer nearby.
- You need an urgent backup on the go.
For the best protection, many people use both a local computer backup and iCloud. One gives you convenience. The other gives you redundancy. In the world of backups, redundancy is not overkill. It is wisdom wearing comfortable shoes.
Common Mistakes to Avoid
1. Forgetting to encrypt local backups
If you want saved passwords, Health data, and similar information included, encryption matters. Just make sure you store the password somewhere safe. Forgetting that password is the digital version of locking your spare keys inside the car.
2. Assuming iCloud backs up everything the same way
Some data may already be syncing to iCloud separately, while other data is stored in the backup itself. That is why backup size and content can vary depending on your settings.
3. Not checking available storage
A local backup can fail if your computer is low on space. An iCloud backup can fail if your account storage is full. Always check before you start.
4. Using a bad cable
A flimsy cable can interrupt the connection and ruin the process. If your phone keeps disconnecting, the cable may be the villain of the story.
5. Never testing your backup habits
You do not need to restore your phone every week, but you should at least confirm that backups are happening regularly. A backup plan only works if it exists outside your imagination.
Extra Tips for Safer iPhone Backups
- Make a local backup before every major iOS update.
- Back up before repairs, battery replacement, or trade-in.
- Keep one recent backup on a computer and one in iCloud if possible.
- Copy important local backups to an external hard drive for added security.
- Label folders or maintain a simple backup routine so you know what is current.
Real-World Experiences With Backing Up an iPhone Without WiFi
People usually start caring about backups after one of three things happens: their phone breaks, their phone disappears, or their phone suddenly acts like it is starring in a disaster movie. That is why no-WiFi backup methods matter so much in real life. They are not just technical options; they are recovery tools when normal life gets messy.
One common experience is the traveler problem. Imagine someone at an airport or hotel with a phone full of family photos and work messages, but the local WiFi is terrible. Public networks are often slow, flaky, or just plain annoying. In that situation, backing up an iPhone to a MacBook or Windows laptop with a cable is often the easiest and fastest move. There is no waiting for cloud upload speeds, no guessing whether the connection will drop at 92%, and no need to trust a random network.
Another common situation happens right before a phone repair. A cracked screen, battery issue, or charging problem can force people into panic mode. Backing up with Finder or Apple Devices right before handing the phone over can feel like putting your valuables in a safe before a storm. Many users do not realize how comforting it is to know their messages, app data, and settings have a recent copy stored somewhere else. That peace of mind is worth a lot.
There is also the “my internet died at the worst possible time” experience. Maybe a storm knocks out home service, maybe the router gives up, maybe the provider decides today is a great day for maintenance. If your iPhone is about to be replaced or reset, waiting for WiFi to come back is not always practical. A cable backup to a computer becomes the hero of the day. It is simple, direct, and surprisingly fast when you compare it with troubleshooting a broken router.
For people with supported 5G iPhones, the ability to back up over cellular can feel almost magical. It is especially useful when you are away from home and suddenly realize you should back up before setting up a new phone. That said, the real-world experience here depends heavily on your carrier, your plan, and how much data your phone needs to upload. It is convenient, but it is not always the cheapest path if your data allowance is limited.
Many experienced users eventually settle into a hybrid routine. They keep iCloud backup on for convenience, then create a local encrypted backup before major updates, travel, or device changes. That combo works well because it covers both everyday accidents and bigger emergencies. In other words, it is the backup version of carrying both an umbrella and a raincoat. You may not need both every day, but when the weather turns ugly, you will feel very clever.
The biggest lesson from real users is simple: the best backup method is the one you will actually do. Fancy plans mean nothing if they never happen. Whether you use Finder, Apple Devices, iTunes, or cellular iCloud backup, the real win is creating a recent copy before you need it. Future you will be extremely grateful, and present you will look like a genius.
Final Thoughts
If you have been wondering how to backup iPhone without WiFi, the answer is refreshingly practical. You can back up to a Mac with Finder, back up to a Windows PC with Apple Devices or iTunes, or, on some supported 5G setups, back up to iCloud over cellular data. Each method has its strengths, and all three are useful in the right situation.
The smartest move is not waiting until your iPhone is already in trouble. Pick one method today, run a backup, and give your future self a much easier life. Because when tech goes wrong, nothing feels more beautiful than a backup that actually exists.


