
Table of Contents >> Show >> Hide
- Before You Buy Another Bin, Set These Ground Rules
- 18 Recycling Storage Ideas That Actually Work
- 1. Install a pull-out recycling cabinet near the sink
- 2. Use a slim, divided under-sink setup for small kitchens
- 3. Create a fold-flat cardboard station
- 4. Add labeled bins inside a pantry or utility closet
- 5. Try a rolling cart for apartment-friendly recycling
- 6. Build a garage wall sorter to free up floor space
- 7. Use clear stackable bins for special recycling streams
- 8. Keep a lidded battery container high and separate
- 9. Add a paper drop zone where mail enters the house
- 10. Use a mudroom tote for deposit-return items
- 11. Turn a bench or banquette into hidden recycling storage
- 12. Use a kitchen cart with a pull-down bin compartment
- 13. Set up a laundry-room sorting corner
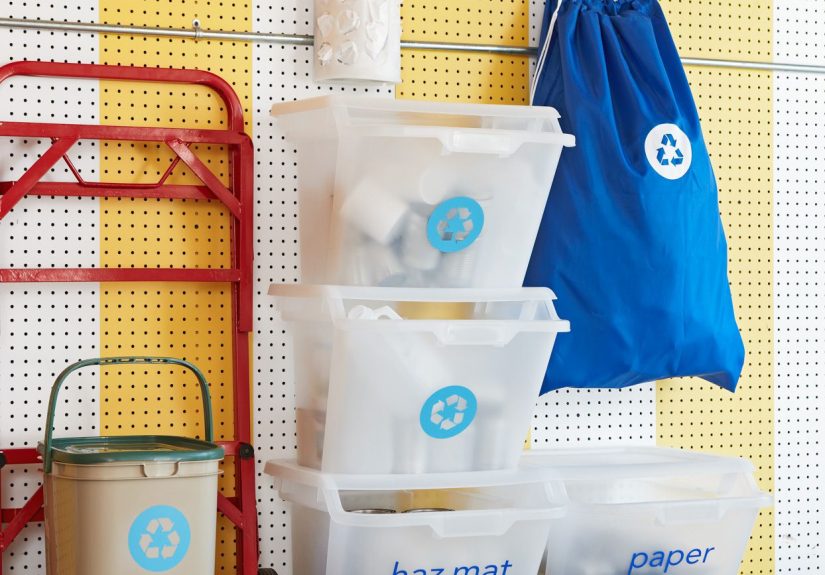
- 14. Hang reusable bags and drop-off sacks on a pegboard
- 15. Create family-friendly color coding
- 16. Use rectangular bins instead of round ones
- 17. Move overflow recycling to a shed or outdoor enclosure
- 18. Build a “take-it-out” transfer station by the garage door
- How to Choose the Right Recycling Storage System for Your Home
- Conclusion
- Real-Life Experiences: What Makes a Recycling System Stick
- SEO Tags
Recycling is one of those habits that sounds delightfully simple in theory. In real life, it often looks more like a leaning tower of delivery boxes, a mystery bag of cans, and one rogue glass jar rolling across the garage floor like it pays rent. The good news? Most recycling problems are not motivation problems. They are storage problems.
When your system is awkward, ugly, or located three zip codes away from where waste actually happens, even the most eco-minded household starts making suspicious choices. A pizza box gets shoved on top of the fridge. Paper mail forms its own mountain range. Bottles pile up under the sink like they are preparing for winter. Suddenly, “going green” feels more like managing chaos in reusable sneakers.
A better setup changes everything. Smart recycling storage ideas make it easier to sort correctly, keep clutter under control, and move materials out of the house before your kitchen starts looking like a cardboard convention. Whether you live in a tiny apartment, a busy family home, or a place where the garage is somehow both full and empty at the same time, the right layout can make recycling feel nearly automatic.
Before You Buy Another Bin, Set These Ground Rules
The prettiest recycling station in the world will not help much if it is working against your local rules. Start by checking what your community actually accepts. That tiny recycling symbol on plastic does not automatically mean the item belongs in your curbside cart. Design your storage around the materials your local program takes most often, such as paper, cardboard, metal cans, glass containers, and accepted plastic bottles or tubs.
Next, make cleanup easy. Containers should be empty and reasonably clean, and paper should stay dry. That means your system needs a little breathing room for rinsed items and a dry zone for cardboard and paper. It also helps to flatten boxes as soon as they enter the home, unless you enjoy losing a hallway to an Amazon fort.
Finally, keep “special items” separate. Batteries, light bulbs, electronics, and other household hazardous materials should not mingle with your everyday recycling. Give them a clearly marked holding spot so they do not end up in the wrong bin during a rushed cleanup.
18 Recycling Storage Ideas That Actually Work
-
1. Install a pull-out recycling cabinet near the sink
If you want a system that feels invisible but works hard, this is the gold standard. A pull-out cabinet keeps recycling close to where bottles, cans, and containers are emptied, but hidden from view when company arrives. Use divided bins so paper does not mingle with damp items, and position the station near cleanup zones for easy daily use.
-
2. Use a slim, divided under-sink setup for small kitchens
Not every home has space for a custom cabinet, but most kitchens have at least a little room to negotiate. A narrow under-sink setup with two or three compact containers can handle your most common recyclables. Reserve one side for rinsed cans and bottles, the other for accepted plastics, and keep a separate dry slot for paper elsewhere. Under-sink space is small, but it can still pull its weight.
-
3. Create a fold-flat cardboard station
Cardboard is the overachiever of household clutter: lightweight, recyclable, and somehow still enormous. Give it a dedicated vertical slot between the fridge and wall, beside the pantry, or along a garage shelf. The key is teaching everyone to flatten boxes immediately. Once that habit sticks, your recycling storage suddenly gains about a thousand square feet. Okay, not literally, but it will feel that way.
-
4. Add labeled bins inside a pantry or utility closet
If floor space is tight, go vertical inside a pantry or utility closet. Stack sturdy labeled bins for paper, cans, bottles, and deposit-return items. This works especially well in homes that prefer a tidier kitchen but still need a central sorting station. Matching containers also make the whole setup look intentional instead of “I panic-bought three plastic tubs and hoped for the best.”
-
5. Try a rolling cart for apartment-friendly recycling
A narrow rolling cart can turn dead space into a flexible recycling station. Slide it between appliances, park it in a laundry nook, or roll it out only when needed. Use the top shelf for mail and paper, the middle for bottles and cans, and the bottom for flattened cardboard or reusable drop-off bags. It is especially useful in rentals because it adds function without requiring a single screw.
-
6. Build a garage wall sorter to free up floor space
When indoor space is scarce, move the bulk storage to the garage. A wall-mounted recycling sorter or hanging rack keeps bins off the floor and easier to sweep around. It also creates a natural “transfer zone” between your small daily indoor containers and your larger pickup-day bins. Translation: less tripping, less visual clutter, and fewer cardboard avalanches by the car door.
-
7. Use clear stackable bins for special recycling streams
Most homes generate more than just cans and paper. Think ink cartridges, batteries, corks, soft-plastic store drop-off items, and old tech accessories. Clear stackable bins make these categories visible, separate, and far less likely to vanish into junk drawers. Label them boldly, and keep the bins somewhere cool and dry. If you cannot see the category, you probably will not use it.
-
8. Keep a lidded battery container high and separate
This one is less about style and more about not accidentally starting a very bad day. Store used batteries in a dedicated nonmetal container with a lid, away from kids, pets, and your regular curbside materials. If you collect lithium-ion batteries, follow local safety guidance for taping terminals or bagging them individually. The container can be small; the peace of mind is enormous.
-
9. Add a paper drop zone where mail enters the house
Paper clutter starts at the door, not in the recycling bin. Place a slim basket, magazine file, or wall pocket near the entryway for junk mail, flyers, and paper inserts. This keeps paper from drifting across counters and dining tables before it finally reaches recycling day. It is not glamorous, but neither is finding expired coupons in your fruit bowl.
-
10. Use a mudroom tote for deposit-return items
If your state has bottle or can redemption, give returnables their own sturdy tote near the mudroom, garage entry, or trunk-loading zone. This saves you from mixing them into standard recycling and makes errand-day pickups far easier. Choose a washable container with handles so transporting it does not feel like training for a strongman competition.
-
11. Turn a bench or banquette into hidden recycling storage
Built-in seating can do more than look charming in breakfast nooks. Lift-top benches or banquettes can hide two or three compact bins while keeping them close to the kitchen. It is a particularly smart solution for smaller homes that need every piece of furniture to earn its keep. Storage that moonlights as seating? That is the kind of efficiency we love to see.
-
12. Use a kitchen cart with a pull-down bin compartment
A freestanding island or cart with a tilt-out or pull-down section can become a discreet recycling hub. This is ideal for older kitchens that lack built-ins but still need a contained sorting area. Bonus points if the cart also holds paper bags, reusable shopping totes, or cleaning cloths. A mobile recycling station is surprisingly handy when your layout changes with your mood or your groceries.
-
13. Set up a laundry-room sorting corner
The laundry room is one of the most underused spots for home recycling organization. It usually has utility flooring, easy-to-clean surfaces, and just enough spare wall to support shelving or narrow bins. Use one hamper-style basket for paper, another for containers, and a shelf above for specialty items. If your kitchen is maxed out, the laundry room can become the quiet hero of the operation.
-
14. Hang reusable bags and drop-off sacks on a pegboard
Some recyclable materials need store drop-off rather than curbside collection. A pegboard in the garage, pantry, or utility area makes it easy to hang reusable bags designated for film plastic, textiles, or other occasional categories. Add hooks for scissors, labels, or gloves if your household likes a system with a little extra polish. Pegboards are basically adult sticker charts with better resale value.
-
15. Create family-friendly color coding
Want the whole household to participate without holding a nightly seminar on acceptable materials? Use color-coded containers or simple labels with both words and icons. Blue for paper, green for glass, gray for metal, and so on. A system that is obvious at a glance reduces contamination and speeds up cleanup, especially in homes with kids, guests, or one very enthusiastic but deeply confused spouse.
-
16. Use rectangular bins instead of round ones
Round bins waste space. There, I said it. Rectangular containers sit flush against walls, fit neatly inside cabinets, and stack more efficiently on shelves. They are usually easier to label, easier to line up, and better at making a small area feel organized rather than crowded. In a category all about managing volume, shape matters more than people think.
-
17. Move overflow recycling to a shed or outdoor enclosure
If your indoor system works but pickup-day overflow is the real headache, give outdoor bins their own proper home. A shed corner, screened enclosure, or lidded bin station keeps larger carts contained and less visually intrusive. This is especially helpful for households that generate lots of cardboard, garden-product containers, or seasonal beverage containers. Just keep the route from kitchen to outdoor storage easy enough that you will actually use it.
-
18. Build a “take-it-out” transfer station by the garage door
Sometimes the best recycling storage idea is not glamorous at all. It is a practical transfer zone near the exit: one place for flattened boxes, one for full sort bins waiting to go outside, and one for special items headed to a drop-off center. This small staging area prevents half-finished recycling chores from spreading across the house. It is less “Pinterest reveal” and more “function saved the day,” which honestly is even better.
How to Choose the Right Recycling Storage System for Your Home
The best recycling storage ideas match your layout and your habits. If most sorting happens while cooking, prioritize hidden kitchen recycling bins or pull-out cabinets near the sink. If your home goes through mountains of shipping boxes, invest in cardboard storage first. If curbside pickup is limited and bulk storage matters more, focus on garage recycling station ideas, stackable containers, and outdoor enclosures.
Also think about frequency. Daily recycling belongs close to the action. Weekly overflow can live farther away. Specialty items should be visible enough to remember, but separate enough to stay safe. In other words, do not build a beautiful system for a fantasy version of your life. Build one for the real version, the one that receives packages on Tuesdays and forgets to break down boxes until Wednesday night.
Conclusion
Good recycling habits are less about guilt and more about design. When your bins are easy to reach, clearly labeled, and sized for the materials you actually generate, the whole process gets lighter. You sort faster. You make fewer mistakes. Your counters stay clearer. And your home stops treating empty jars and cardboard boxes like long-term tenants.
These recycling storage ideas prove that going green does not require a giant mudroom, a custom renovation, or a personality change. It just needs a smarter setup. Start with one friction point, fix that area first, and let the system grow from there. Before long, recycling becomes what it should have been all along: simple, orderly, and not something you have to wrestle in the hallway.
Real-Life Experiences: What Makes a Recycling System Stick
The most interesting thing about recycling storage is that the “best” solution is rarely the fanciest one. In real homes, the winning system is usually the one that removes one annoying step. That is it. One less cabinet to open. One less trip to the garage. One less moment of standing in the kitchen holding a yogurt tub and wondering whether this is a recycling decision or a character test.
People often assume they need a huge custom station before they can recycle consistently. In practice, many households improve dramatically with one small change. A family that keeps tossing mail on the counter adds a slim paper bin by the front door and suddenly the kitchen island reappears. An apartment renter uses a rolling cart and stops storing cans in grocery bags under the sink. A busy parent adds labels with icons, and now the kids actually sort things correctly instead of treating recycling like a carnival game.
There is also a surprisingly emotional side to getting this right. Clutter from recyclables feels different from normal clutter because it comes with good intentions. You are not keeping useless junk; you are trying to do the right thing. But good intentions piled in a corner still look like a mess. Once those materials have a designated place, the whole home feels calmer. You stop seeing recycling as unfinished business and start seeing it as a routine.
Another common experience is realizing that the bottleneck is not sorting, but transfer. Many people are perfectly willing to separate paper, cans, and bottles indoors, yet the whole system falls apart when it is time to move everything outside. That is why a staging area by the back door, mudroom, or garage entry works so well. It turns recycling from a giant weekend chore into a simple handoff. Indoor bin gets full, contents move out, life continues, nobody writes a dramatic monologue about cardboard.
Small-space households often discover that visibility matters more than size. If the bin disappears too well, the habit disappears too. A pretty basket for paper in plain sight may outperform a “hidden” solution that is too inconvenient to use. On the other hand, larger households usually benefit from concealment because visual noise becomes the enemy fast. The sweet spot is a system that feels obvious when you need it and invisible when you do not.
Over time, the biggest reward is not just environmental. It is practical. Floors stay clearer. Counters stay usable. Garbage smells improve because containers get rinsed sooner. Garage space becomes easier to manage because cardboard is flattened instead of multiplying overnight. The system starts saving time in little ways that add up. And once that happens, recycling stops being a chore you mean to do better. It becomes part of how your home works, quietly and efficiently, exactly as it should.


