
Table of Contents >> Show >> Hide
- Before You Swing: Two-Minute Demo Reality Check
- Hand Tools That Do the Dirty Work (Quietly, With Attitude)
- Power Tools That Turn “All Day” Into “Before Lunch”
- Flooring & Soft Materials: The “Why Is This Stapled?” Department
- How to Choose the Right Demo Tool (Without Buying a Whole Hardware Store)
- Clean Demo Is Smart Demo (Dust, Debris, and “Future You”)
- Conclusion
- Field Notes: of Real-World Demo “Experience” (So You Don’t Learn the Hard Way)
Demolition is the part of remodeling where you get to feel powerful… right up until you realize the “easy demo” you planned
is now a three-day relationship with a stubborn tile floor and a thousand tiny staples. The good news: demolition doesn’t have to be
chaos. With the right tools, you can work faster, cleaner, and with way less “why is this nailed from the future?” frustration.
This guide is inspired by the classic “demo toolbox” style popularized by BobVila.com, and expanded with practical, real-world
tips DIY remodelers use to survive (and even enjoy) teardown day. We’ll cover what each tool is best at, where it shines, and
what can go wrong if you use the “close enough” tool instead. Spoiler: “close enough” is how trim turns into confetti.
Before You Swing: Two-Minute Demo Reality Check
DIY demolition can be safe and satisfying, but it’s also where you’re most likely to find hidden surprises: live wires,
mystery plumbing, sharp metal edges, silica dust from masonry, or old paint in pre-1978 homes that may contain lead.
If you suspect asbestos, lead hazards, structural changes (especially load-bearing walls), or gas line workpause and bring in a pro.
Being brave is great. Being safe is better.
Hand Tools That Do the Dirty Work (Quietly, With Attitude)
1) Sledgehammer
When you need brute forcebreaking up plaster, knocking out non-structural masonry, smashing old fixtures (carefully)the sledgehammer
is the classic demolition icon. It’s not subtle, and that’s the point.
- Best for: Breaking stubborn materials, starting wall openings, cracking small concrete sections.
- Pro tip: Control beats power. Shorter swings can be more accurate and less exhausting than “full-send” overhead slams.
- Watch out: Flying debris. Eye protection isn’t optionalunless you enjoy the “surprise shard” lifestyle.
2) Pry Bar (Flat Bar / Wrecking Bar)
The pry bar is the leverage king. It separates what was never meant to be separated: drywall from studs, trim from walls,
subfloor from joists, and your patience from your body. If demolition had a Swiss Army tool, it would be this.
- Best for: Prying, lifting, pulling nails, peeling materials apart.
- Pro tip: Use a thin shim or scrap wood under the bar to protect surfaces you’re trying to salvage.
- Watch out: Sudden “release.” When it pops, it really popskeep your face out of the line of fire.
3) Locking Pliers
Stripped screws. Headless nails. Corroded fasteners. Locking pliers clamp down like a determined crab and let you twist, pull,
or coax stubborn hardware out of hiding.
- Best for: Grabbing damaged fasteners, holding small parts, pulling nail shanks.
- Pro tip: Adjust the clamping pressure so it locks tight without crushing what you’re gripping.
- Watch out: Sharp edges and pinch pointsthis tool bites.
4) Needle-Nose Pliers
When fasteners are wedged in tight spotsbehind trim, inside narrow cavities, around staplesneedle-nose pliers reach where your
fingers should absolutely not go.
- Best for: Pulling staples, grabbing small wires, reaching into tight gaps.
- Pro tip: Twist-and-pull is often more effective than pure pulling force.
- Watch out: Old staples and lath can be razor-sharp. Gloves helpmore on that soon.
5) Nail Puller (Pincer-Style)
When you’re removing a lot of nailsespecially ones that are flush or hard to gripa dedicated nail puller saves time and reduces
the “why do I still have nails in my life?” feeling.
- Best for: Pulling nails cleanly, especially stubborn or flush-set nails.
- Pro tip: Rock it for leverage. Use a small wood block as a fulcrum to increase pulling power and protect surfaces.
- Watch out: Splintering wood if you yank too aggressively without leverage support.
6) Tin Snips
Cutting sheet metal with the wrong tool is how you create a jagged, hand-slicing masterpiece. Tin snips are made for ductwork,
metal lath behind plaster, flashing, and other thin metal you’ll meet during remodels.
- Best for: Sheet metal, wire lath, light-gauge materials.
- Pro tip: Make small cuts and keep controllong aggressive cuts can warp metal and bind the blades.
- Watch out: Freshly cut metal edges are dangerously sharp. Treat them like tiny knives.
7) Hammer (Standard Claw / Rip Hammer)
A regular hammer might not feel “demolition-specific,” but it’s the precision tool of teardown: tapping, prying small sections,
knocking loose trim, and pulling nails after you’ve exposed them.
- Best for: Controlled removal, nail pulling, tapping loose trim or drywall sections.
- Pro tip: Use the hammer with a pry bar: tap the bar into seams, then leverage without destroying everything around it.
- Watch out: Over-swinging in tight spaceswalls and knuckles both lose that fight.
8) Demo Fork (Flooring / Deck Board Wrecker)
Ripping up flooring or deck boards is hard on your back if you’re crouching and prying all day. A demo fork lets you work standing up,
using long-handle leverage to lift boards and stubborn material more ergonomically.
- Best for: Pulling up nailed boards, flooring removal, rotted deck boards.
- Pro tip: Start at an edge or seam. Once you get a “starter gap,” the fork becomes dramatically more effective.
- Watch out: Sudden board snap. Nails can spring loosekeep feet clear and wear sturdy boots.
Power Tools That Turn “All Day” Into “Before Lunch”
9) Reciprocating Saw
The reciprocating saw is the demolition workhorse: it cuts through wood, nails, screws, PVC, and many metals when paired with the
right blade. It’s the tool you reach for when you want to remove something without negotiating with it.
- Best for: Cutting studs, trimming out framing, removing pipes, slicing fasteners.
- Pro tip: Let the saw do the worksteady pressure beats forcing it, and the cut stays straighter.
- Watch out: Vibration and kickback. Two hands, stable stance, and awareness of what’s behind the cut line.
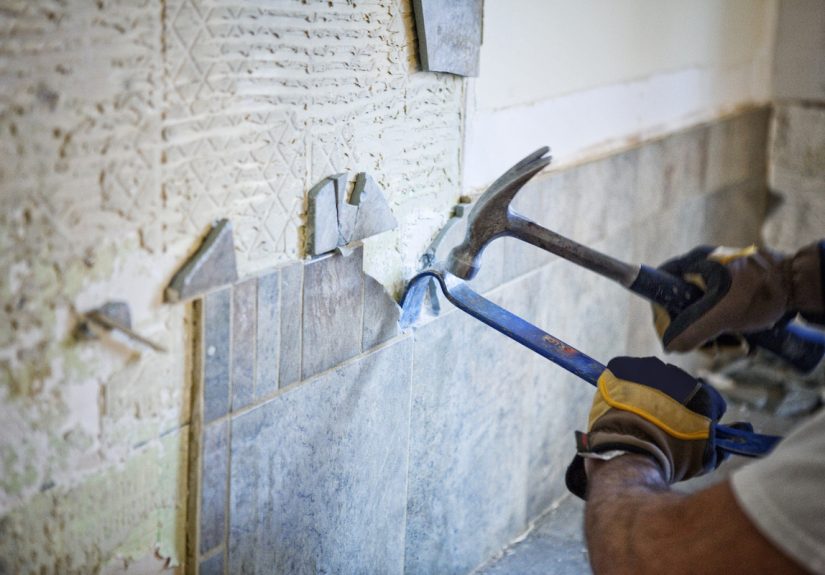
10) Demolition Hammer (Electric Breaker / SDS-Max Style)
When tile, mortar, brick, or concrete needs to come out, a demolition hammer with a chisel attachment can save your arms and your sanity.
It’s essentially a compact jackhammer designed for “home scale” destruction.
- Best for: Tile removal, breaking masonry, chipping thin concrete, busting out mortar beds.
- Pro tip: Work in sections. Small bites keep the tool controllable and reduce accidental damage to surrounding materials.
- Watch out: Dustespecially silica from masonry. Use appropriate dust control and respiratory protection.
11) Oscillating Multi-Tool
If demolition had a “sneak mode,” this is it. The oscillating multi-tool excels at controlled cuts and detail work: trimming drywall,
cutting nails in tight spots, slicing caulk lines, or freeing stuck trim without turning the whole wall into modern art.
- Best for: Flush cuts, detail trimming, removing small sections cleanly, cutting in tight spaces.
- Pro tip: Score paint/caulk seams before prying trim. It reduces tear-out and makes everything look less… attacked.
- Watch out: Blades get hot. Give them a break (and don’t grab the metal bit like it’s a friendly handshake).
12) Pipe Cutter (Close-Quarters Tubing Cutter)
In kitchens and bathrooms, demolition often means dealing with old plumbing in cramped spaces. A compact pipe cutter makes clean cuts
on certain pipe materials without needing a big saw swing radius.
- Best for: Cutting copper and other tubing where space is tight.
- Pro tip: Aim for clean, controlled cuts. Rushed cutting can deform tubing and complicate repairs later.
- Watch out: Plumbing can hold water. Shutoffs aren’t suggestionsverify lines are off before any cutting.
13) Shingle Remover (Roof Tear-Off Tool)
Roof tear-off is one of the most physically punishing demolition tasks. A shingle remover (often shaped like a notched shovel with teeth)
is designed to get under shingles and nails more efficiently than a standard shovel or pry bar.
- Best for: Removing old shingles, prying nails, lifting roofing material while standing upright.
- Pro tip: Work from the top down in manageable lanes, keeping your footing and debris under control.
- Watch out: Roof work is fall-risk work. If you’re not comfortable with height safety, it’s a strong “hire-a-pro” category.
Flooring & Soft Materials: The “Why Is This Stapled?” Department
14) Carpet Puller
Old carpet can be deceptively heavy and awkward, especially once it’s dusty and glued to your entire existence. A carpet puller clamps and
grips the carpet edge so you can pull with control instead of a sweaty bear hug.
- Best for: Starting carpet removal, gripping edges, pulling large sections efficiently.
- Pro tip: Cut carpet into manageable strips before hauling it outyour back will send thank-you notes.
- Watch out: Tack strips and staples. They’re basically tiny floor piranhas.
15) Demolition Gloves (Heavy-Duty Work Gloves)
Gloves aren’t glamorous, but neither is grabbing splintered wood, jagged metal, or broken tile with bare hands. Quality demolition gloves
add grip, reduce abrasion, and help protect against cuts and punctures during teardown.
- Best for: Handling debris, pulling materials, protecting against sharp edges and splinters.
- Pro tip: Keep a “fine” glove and a “brute” glove. Sometimes you need dexterity; sometimes you need armor.
- Watch out: Gloves are not invincible. Still treat sharp metal and broken tile like the hazard they are.
How to Choose the Right Demo Tool (Without Buying a Whole Hardware Store)
If you’re building a demolition kit from scratch, prioritize versatility and control first, then add muscle. For most DIY remodelers,
the most-used combo looks like this:
- Core leverage: Pry bar + hammer
- Core cutting: Reciprocating saw + oscillating multi-tool
- Core flooring: Demo fork or carpet puller (depending on what you’re removing)
- Core grip: Locking pliers + needle-nose pliers
- Core protection: Demolition gloves (and ideally eye/respiratory/hearing protection, too)
Then match tools to materials. Tile? A demolition hammer is a game-changer. Ductwork or metal lath? Tin snips. Plumbing in tight spaces?
Pipe cutter. Roofing? Shingle remover. The right tool doesn’t just speed things upit reduces accidental damage to the stuff you’re keeping.
Clean Demo Is Smart Demo (Dust, Debris, and “Future You”)
Demolition is messy by nature, but your job is to keep the mess from becoming a health hazard or a project killer. Masonry and tile dust can
contain respirable crystalline silica, and older homes may contain lead-based paint. Use basic containment (plastic sheeting and a plan for
debris routes), clean as you go, and take dust seriouslyespecially during cutting, grinding, and chipping.
Also: label anything you disconnect. A small strip of tape and a marker can save hours of “Which wire is this?” later. And yes, you can
still feel tough while holding a Sharpie. That’s called growth.
Conclusion
The best demolition tool isn’t the loudest oneit’s the one that gives you control. A balanced demo kit lets you switch from “smash it”
to “save it” in seconds, which is exactly what remodeling requires. Build your toolkit around leverage, cutting, grip, and protection,
and you’ll demo faster, safer, and with fewer surprise holes in places holes should not be.
And remember: demolition is the start of something better. So swing smart, pry gently when needed, and treat dust like the villain it is.
Your lungs have long-term plans. Let’s not ruin them for the thrill of removing a backsplash.
Field Notes: of Real-World Demo “Experience” (So You Don’t Learn the Hard Way)
Ask a group of DIY remodelers about demolition and you’ll hear the same theme: everyone starts out thinking demo is the “fun part,”
and then reality shows up wearing steel-toe boots and carrying a bag of hidden fasteners. The first “experience lesson” most people learn
is that demolition is rarely hard because the material is strongit’s hard because the material is attached in ten different ways,
by three different generations of homeowners, and at least one of them owned a nail gun and a questionable sense of humor.
One common story: the bathroom tile that “should pop right off.” It doesn’t. It laughs at your putty knife. This is where a demolition
hammer earns its reputation. DIYers often describe the moment they switch from hand chiseling to a powered chisel as a full personality change:
suddenly the project goes from “I may live with this tile forever” to “Oh, it actually comes off in sections.” The surprise is not just speed,
but reduced frustrationbecause consistent, controlled force beats endless pounding.
Another frequent lesson is that pry bars aren’t just for brute prying; they’re for finesse. People who want to salvage trim, baseboards,
or cabinet parts often learn to slow down: score paint lines first, work a flat bar behind the trim, and use a small block of wood as a buffer.
The “experience” here is discovering that you can be both a destroyer and a conservationist in the same afternoon. It’s demolition, not a rampage.
Flooring teardown has its own lore. DIYers who remove carpet for the first time are often shocked by how much weight and dust is rolled into
those innocent-looking strips. That’s why the practical crowd cuts carpet into manageable widths, tapes the rolls, and uses a carpet puller
to get a reliable grip. Then comes the true boss battle: staples. Lots of them. This is usually the moment someone invents new vocabulary.
The remodelers who look happiest afterward are the ones who used the right pliers, a scraper, and took breaks before their hands cramped
into permanent “claw mode.”
Roofing tear-off stories tend to include two consistent takeaways: a shingle remover saves backs, and roof work is not the place to test
your comfort with heights. Plenty of DIYers start confident and then realize that steady footing and fatigue management matter more than
raw strength. Those who decide to hire a pro for the roof aren’t “less DIY”they’re just choosing not to turn a home project into an emergency.
Finally, experienced DIYers talk about dust like it’s a character in a horror movie: silent, sneaky, and everywhere. They learn to isolate
rooms, keep cleanup continuous, and respect respiratory protection when cutting or chipping masonry. The “experienced” approach isn’t just
about finishing fasterit’s about finishing with fewer regrets, fewer injuries, and a house that doesn’t look like a demolition museum for weeks.
If there’s one universal demo lesson, it’s this: the right tool won’t just save time. It will save your future self from a lot of unnecessary pain.
And future you deserves nice thingslike intact knuckles and a weekend that doesn’t involve picking staples out of the subfloor.


