
Table of Contents >> Show >> Hide
- Quick Table of Contents
- 1) Match bulbs to your climate and chill time
- 2) Buy the right bulbs (and skip the sad ones)
- 3) Plant at the right timebefore the ground freezes
- 4) Pick a spot with sun at the right season
- 5) Drainage is non-negotiable
- 6) Improve soil the smart way (compost wins)
- 7) Use correct planting depth (and adjust for soil type)
- 8) Space bulbs like you mean it
- 9) Pointy end upunless it’s confusing
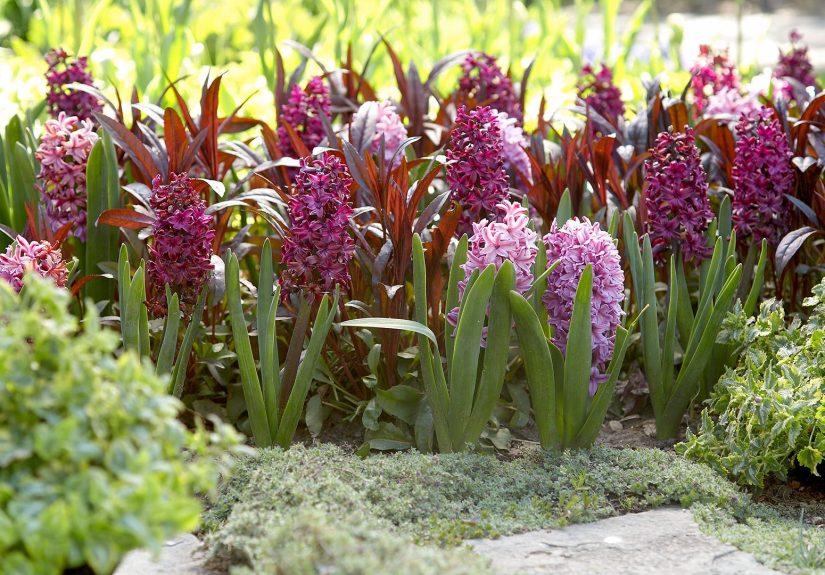
- 10) Plant in groups for a natural look
- 11) Water once well, then don’t drown them
- 12) Mulch for stability, not smothering
- 13) Protect from critters without starting a feud
- 14) Care after bloom so next year doesn’t flop
- Common “Why Didn’t This Work?” Fixes
- Experience Notes: Lessons Gardeners Learn the Hard Way (Plus a Few Laughs)
- Conclusion
Bulbs are basically nature’s time-release capsules: you bury something that looks like a tiny onion (or a lumpy
walnut, depending on the bulb) andmonths lateryour yard throws a party. But bulbs are also picky in the way
that only plants can be: they want the right timing, the right depth, the right drainage, and (apparently) the
right amount of neighborhood squirrel supervision.
The good news: once you understand a handful of fundamentals, planting bulbs is one of the easiest ways to get
big spring color with very little ongoing work. The even better news: these 14 tips are the “do this and you’ll
look like a gardening wizard” kindnot the “remember to breathe while gardening” kind.
1) Match bulbs to your climate and chill time
Before you fall in love with a photo of tulips that look like they belong on a postcard, check whether your area
gives those bulbs what they need. Many classic spring-flowering bulbs (tulips, hyacinths, some daffodils) rely
on a cold period to trigger strong blooms. In colder zones, nature handles the “refrigeration.” In warmer regions,
you may need to buy pre-chilled bulbs or chill them yourself in a refrigerator (separate from fruit).
Practical example
If you live somewhere with mild winters, focus on bulbs that reliably perform with less chill (many daffodils,
species tulips, paperwhites, some alliums), or plan on chilling “high-chill” bulbs before planting. Your spring
display should not depend on wishful thinking.
2) Buy the right bulbs (and skip the sad ones)
Bulbs are living storage organs, which is a fancy way of saying they should feel firm and healthylike a good
onion, not like a marshmallow that’s seen things. Choose bulbs that are plump, dry, and free of mold or soft spots.
Bigger is often better for the first year’s flower show (especially with tulips and daffodils), but “big” is only
helpful if it’s also healthy.
- Good bulbs: firm, intact skins, no sour smell, no visible rot
- Skip bulbs: squishy, moldy, damaged basal plates, or already sprouting like it’s April
3) Plant at the right timebefore the ground freezes
Timing is the difference between “glorious spring color” and “I planted something… I think?” Most spring-blooming
bulbs are planted in fall so they can grow roots before winter and bloom in spring. A common guideline is planting
roughly 6–8 weeks before the ground freezes or before your first hard frost windowlate September through November
for many regions, depending on your USDA zone and local weather patterns.
Rule of thumb
Cool soil is your friend. Warm soil can encourage premature top growth, which is not the vibe you want heading into
winter.
4) Pick a spot with sun at the right season
“Full sun” advice gets tricky with bulbs, because bulbs care about spring sunlightwhen trees might still be bare.
That means a spot under a deciduous tree can be perfect: bright in early spring, then shaded later when bulb foliage
is fading (and you’re ready to forget it was ever there).
- Most spring bulbs like at least 6 hours of sun while actively growing.
- Some tolerate partial shade, especially early bloomers like snowdrops and certain crocus.
5) Drainage is non-negotiable
If bulbs had a group chat, the number-one complaint would be: “My roots were fine until I sat in cold water for
two months.” Poor drainage can rot bulbs, especially through wet winters and heavy soils. Avoid low spots where
water pools. If your yard holds water like a grudging sponge, plan on raised beds, berms, or containers.
Quick drainage check
Dig a test hole about 12 inches deep, fill it with water, and see how fast it drains. If it’s still waterlogged
hours later, bulbs will be… unhappy.
6) Improve soil the smart way (compost wins)
Bulbs don’t need “fancy” soil, but they do need workable soil. Mix in compost to improve structure, encourage
healthy roots, and help moisture behave like a responsible adult (not a chaotic puddle). If your soil test says
nutrients are low, you can fertilizebut compost is the safest universal upgrade.
A note on fertilizer
More fertilizer is not automatically more flowers. In many gardens, especially where phosphorus is already adequate,
adding strong fertilizers at planting can be unnecessary. When in doubt, compost + a soil test beats guessing.
7) Use correct planting depth (and adjust for soil type)
Planting depth matters because it affects winter protection, stem strength, and whether your bulb does the right
thing at the right time. Most packages provide species-specific depth, but these general guidelines work well:
| Bulb Type | Typical Depth | Typical Spacing |
|---|---|---|
| Large bulbs (tulips, daffodils, hyacinths, many alliums) | 6–8 inches (often ~2–3x bulb diameter) | 4–6 inches apart |
| Small bulbs (crocus, snowdrops, scilla, grape hyacinth) | 2–4 inches | 2–3 inches apart |
A classic rule of thumb is planting bulbs about two to three times their diameter (or roughly three
times their height/width, depending on how the guidance is framed). Then adjust for soil:
- Heavy clay soil: plant a little shallower (bulbs dislike staying wet).
- Light sandy soil: you can plant a bit deeper to prevent drying and heaving.
If your bulb has no obvious “top,” plant it on its side. The plant will figure it outbecause plants are stubborn.
8) Space bulbs like you mean it
Spacing is about airflow, root competition, and the look you want. Too tight and bulbs fight; too wide and your
“spring display” becomes a “few brave flowers spaced like awkward strangers in an elevator.”
Design-minded spacing
For a full look, many gardeners plant large bulbs about 4–6 inches apart and smaller bulbs 2–3 inches apart.
Want a more natural meadow vibe? Space a little wider and use bigger drifts (more bulbs per area).
9) Pointy end upunless it’s confusing
Most bulbs are easy: pointy end up, roots down. But some are shaped like they were designed by a committee that
never met. If you truly can’t tell which end is which, plant the bulb on its side. It might waste a little energy
reorienting, but it won’t doom the plant.
10) Plant in groups for a natural look
Bulbs look best in clusters and drifts, not in strict little soldier rows (unless you’re intentionally going for
“formal botanical garden energy”). A reliable guideline is:
- Large bulbs: groups of 7–15+ for real impact
- Small bulbs: groups of 20–50+ for a “carpet” effect
For a more natural look, toss bulbs gently onto the soil and plant them where they land. It’s the only time
“random” is actually a professional technique.
11) Water once well, then don’t drown them
Water deeply after planting to settle soil and kickstart root growth. After that, bulbs typically don’t need much
watering in fall and winter unless conditions are unusually dryespecially in-ground plantings. Overwatering is a
fast track to rot, particularly in heavy soil.
Container note
Containers dry out faster than garden beds. If you’re planting bulbs in pots, check moisture occasionallymoist is
good, soggy is not.
12) Mulch for stability, not smothering
Mulch helps moderate temperature swings, reduce soil heaving, and protect bulbs in colder climates. It also makes
your garden look like you have your life together. Apply a light-to-moderate layer after planting, especially once
the ground cools.
- Use shredded leaves, pine needles, or bark mulch.
- Avoid piling mulch directly against emerging shoots in springdon’t make them fight their way out.
13) Protect from critters without starting a feud
Squirrels, chipmunks, and sometimes voles view fresh bulb plantings as a seasonal buffet announcement. Protection
strategies can be simple and effective:
Critter-smart tactics
- Physical barriers: lay chicken wire or hardware cloth over the planting area and pin it down, then mulch.
- Choose less tasty bulbs: many animals dislike daffodils, alliums, and some fritillaria.
- Avoid “smelly attractants” at planting: some organic fertilizers can draw digging pests.
Bonus move: plant “tasty” bulbs (like tulips) deeper and underplant with less tasty bulbs (like daffodils or alliums)
to make the buffet harder to find and less rewarding.
14) Care after bloom so next year doesn’t flop
The flowers are the headline, but the foliage is the savings account. After blooming, bulbs need green leaves to
photosynthesize and store energy for next year. If you cut leaves too early, you’re basically asking the bulb to
perform next spring on a diet of bad decisions.
Post-bloom checklist
- Deadhead flowers (optional for some bulbs, helpful for many) so energy goes to the bulb, not seed.
- Leave foliage until it yellows naturallyoften 4–6+ weeks.
- Consider a light feeding in early spring or after bloom if your soil is poor (soil test helps).
- Plan camouflage: interplant bulbs with perennials so fading leaves are hidden later.
Common “Why Didn’t This Work?” Fixes
Problem: Bulbs never bloomed
- Planted too shallow or too deep for the species
- Not enough winter chill (common in warmer climates)
- Too much shade while foliage was growing
- Bulbs were old, dried out, or damaged before planting
Problem: Bulbs rotted
- Soil stayed wet (poor drainage, low spot, heavy clay)
- Overwatering after planting
- Mulch too thick and holding moisture against the soil
Problem: Something dug them up
- No barrier (wire mesh is the simplest fix)
- Planted “favorite snacks” (tulips, crocus) without deterrents
- Used odor-rich amendments right in the hole
Experience Notes: Lessons Gardeners Learn the Hard Way (Plus a Few Laughs)
If bulb planting were a movie, the “tips” would be the traileruseful, inspiring, and slightly dramatic. The
“experiences” are the director’s cut, where you learn what happens when real weather, real soil, and real animals
show up to audition for chaos.
One of the most common first-year lessons is that soil behaves differently in different parts of the same yard.
You can have a spot that looks perfectly normaluntil winter rains turn it into the kind of puddle that makes ducks
feel emotionally supported. Gardeners often remember the spring they planted bulbs in a low area “because it was
open and sunny,” only to discover that sunlight doesn’t cancel out swampiness. The fix is usually straightforward:
move bulbs to a slight slope, add a raised bed edge, or mound soil into a gentle berm. The bigger lesson is even
simpler: bulbs love moisture, but they hate sitting in it.
Another classic experience is learning that “I’ll remember where I planted them” is not a plan.
In fall, you’re energized and organized. In late winter, you’re staring at a yard that looks like a beige postcard
and wondering where you buried 75 tiny investments. Lots of gardeners end up accidentally stabbing their own bulbs
with a trowel while planting something else. A few low-effort habits prevent this: take a quick phone photo of
the planted area, mark the spot with a small label or stone, or sketch a simple map. You don’t need a blueprintjust
enough evidence to convince Future You that Past You had a system.
Many people also have a memorable first run-in with the Neighborhood Squirrel Union. You plant
tulips, you water, you mulch, you go inside feeling like a gardening geniusand by morning, it looks like tiny
construction workers held a midnight meeting in your flowerbed. The experience teaches two things fast: (1) squirrels
can smell disturbed soil, and (2) a lightweight barrier like chicken wire is not “extra,” it’s “peacekeeping.”
Gardeners who start using wire or mesh often describe the feeling as moving from “hope-based gardening” to
“evidence-based gardening.”
There’s also the experience of learning how bulbs look best when you plant more than you think you need.
A single tulip is charming. Three tulips are polite. Seven tulips are a statement. Twenty tulips are a spring
event. People often underplant the first year because bulbs come in small bags and optimism comes in large quantities.
Then spring arrives, the flowers are gorgeous, and the only regret is not planting more. The fix is budgeting
bulbs the way you budget snacks for a road trip: however many you think is enough, add a little more.
Finally, one of the most helpful long-term lessons is that bulb foliage is not your enemy.
It’s tempting to tidy up right after bloomespecially if you’re the kind of person who alphabetizes spices or
straightens picture frames in other people’s houses. But gardeners who let foliage yellow naturally almost always
see better blooms the following year. The best “experience hack” is to plan ahead: plant bulbs among perennials,
ornamental grasses, or groundcovers that expand later and hide fading leaves. That way, you get the spring show
and you get to keep your tidy-garden reputation.
In other words: bulbs reward patience, smart placement, and the humble acceptance that wildlife has opinions.
Plant them well once, and you’ll be enjoying spring color while your neighbors are still arguing with their lawn.
Conclusion
Planting bulbs is one of the most satisfying “future you will be thrilled” garden projects. Nail the basicsright
bulb, right time, right drainage, right depthand your yard can wake up in spring looking like it got a professional
makeover. Keep it simple, plant in generous groups, and remember: bulbs are low-maintenance, not no-maintenance.
A little planning now turns into months of brag-worthy blooms later.


